Home Lab Guides: Proxmox 7 — Active Directory Integration
This guide will take you through the process of integrating Active Directory authorization with Proxmox 7. Not tested on Proxmox 6, but should still work the same.
Home Lab Guides: Proxmox 6/7
Part 1: Basic Setup and Installation
Part 2: PCI(e) Passthrough with NVIDIA
Part 3: IPFire Firewall
Part 4: Pi-hole
Part 5: Network and System Monitoring with Grafana, InfluxDB and Telegraf
Part 6: Automation with Ansible
Part 7: Active Directory Integration
Table of Contents
1.0 Preparation
2.0 Setup Active Directory Authentication
  2.1 Create AD Server Authentication
  2.2 Setup Sync Options
  2.3 Sync the PVE node and AD server
  2.4 Verify Users and Groups
3.0 Setup Permissions
4.0 Author's Notes
1.0 Preparation
This guide assumes you already have an Active Directory server and DNS running and uses Windows Server 2019.
- You may need to install realmd and other packages before the PVE authentication GUI works properly.
apt install realmd sssd oddjob oddjob-mkhomedir adcli samba-common2.0 Setup Active Directory Authentication
- Navigate to Datacenter -> Permissions -> Authentication.

2. Click ‘Add’ and choose ‘Active Directory Server’.
2.1 Create AD Server Authentication

- Set your Realm and Domain. Note: Some may have issues later on with not naming the Realm the same as the Domain.
- Do not select ‘Default’ until we have confirmed access with an AD user. It won’t cause a problem if you do, but the PVE GUI login will default to the AD auth method instead of PAM.
- Set the Server with the IP of the AD server. If, on the PVE node, you’ve set a DNS server that has an entry for the AD server, you can use the FQDN.
- The rest is up to you but not necessary as the defaults are fine.
2.2 Setup Sync Options
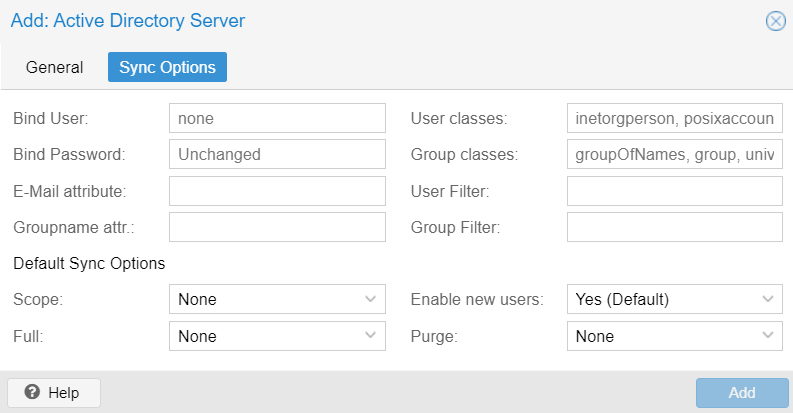
- Create a bind user in Active Directory server with only an alphanumeric (a-Z, 0–9) password because special characters can cause problems. Note: this user can be used for any other LDAP auth as well but a more secure password should be used on systems that can handle special characters.
- Set your bind user using Distinguished Name. Note: Run dsquery user -name “User Name” in PowerShell on the AD server to find the appropriate DN.
CN="User Name",CN=Users,DC=example,DC=com3. If you want users to be sync’d later by a specific group, create that group in ADUC and modify the following filter to be put in the ‘Group Filter’ where proxAdmins is the group you want to filter for. Note: there are ways of filtering by multiple groups and users; duckduckgo.com is a good search engine for that.
memberOf=CN=proxAdmins,CN=Users,DC=example,DC=com4. You can set the Default Sync Options if you want, but it’s not necessary. It’s only for ease later on when syncing.
5. Click ‘OK’ to save and exit.
2.3 Sync the PVE node and AD server
- In the Authentication page in the PVE GUI, click the newly created AD server and then click ‘Sync’.
- Set your Scope.
- Set Full to Yes.
- Set Purge ACLs to Yes if you want to clear ACLs.
- Leave Enable New as Yes.
- Click ‘Preview’ to ensure no errors when connecting to the AD server and then click ‘Sync’.
2.4 Verify Users and Groups
If you have trouble removing users and get an error that the user doesn’t exist, navigate to /etc/pve/ and edit the user.cfg file.
- Navigate to Datacenter -> Permissions -> Users to confirm your users have been successfully imported.
- Log out of the PVE GUI and try to log in as one of the AD users. Make sure you select your AD realm for authentication.

3. Once logged in as an AD user, you won’t be able to see anything as there are no permissions set. Note: Only the root@pam user can access the node shell through the GUI.
4. Log out and then back in as root using PAM authentication.
3.0 Setup Permissions
- As root@pam user, navigate to Datacenter -> Permissions and click ‘Add’ then ‘User Permission’.
- Select ‘/’ as the Path to apply permissions to the top level.
- Select the User you want from the dropdown.
- Set the Role to Administrator.
- Ensure Propagate is selected to ensure permissions are passed down to the node’s children.
- Return to the Authentication page and set your AD as default.
Your PVE node should now be fully integrated with Active Directory and able to authenticate with an AD user that has full administrative permissions within Proxmox. Congratulations!
4.0 Author’s Notes
- Thanks for reading this article! If you have any questions, suggestions or comments, feel free to leave a comment.
- I didn’t redo this on a fresh install so I may have missed something. If you come across any errors, please let me know.
- If you get a credentials error (52e) in /var/log/syslog when syncing, double-check you have the right Distinguished Name. That was the big hiccup for myself and a lot of others.