Home Lab Guides: Proxmox 6 — Basic Setup and Installation

This guide will take you through the entire process of preparing and installing Proxmox 6.3 and creating a couple of virtual machines (Windows 10 & Ubuntu Server 20.04).
Home Lab Guides: Proxmox 6
Part 1: Basic Setup and Installation
Part 2: PCI(e) Passthrough with NVIDIA
Part 3: IPFire Firewall
Part 4: Pi-hole
Part 5: Network and System Monitoring with Grafana, InfluxDB and Telegraf
Part 6: Automation with Ansible
Guide Host System Specs
Processor: i7-4820K
Motherboard: P9X79 LE
Memory: 24GB
OS HDD: 500GB SSD
ISO HDD: 500GB HDD
Video Card: GTX 970
Table of Contents
1.0 Preparation
  1.1 System Requirements
  1.2 Installation Files
  1.3 USB Boot Loader
2.0 Installation
  2.1 Pre-Install
    2.1.1 Host BIOS Prep
    2.1.2 Enable VT-d/AMD-d CPU flags
    2.1.3 Set boot drive
  2.2 Install
  2.3 Post-Install
3.0 Setup
  3.1 Remote Access
  3.1.1 WebUI
  3.1.2 SSH
    3.1.2a PuTTY
    3.1.2b Terminal Prompt
  3.2 Update
4.0 Virtual Machines
  4.1 Uploading ISOs
  4.2 Create a Virtual Machine
  4.2.1 Ubuntu Server 20.04
5.0 References
6.0 Author's Notes
1.0 Preparation
You will need:
- A host (physical server) that meets the system requirements.
- A laptop or other device to connect to the WebUI and/or SSH.
- A router or switch to allow remote management.
- Your home WiFi router should work fine but you’ll want to have a direct connection to your host.
- If you don’t have a router or switch, you can still connect manually with an ethernet patch cord but that requires customization beyond the scope of this guide.
1.1 System Requirements
Proxmox is a type 1 hypervisor and needs a system that can handle the loads placed on it. The official Proxmox website suggests the following hardware; however, the Intel VT/AMD-V CPU flag is only necessary if you intend to passthrough physical hardware like a graphics card to a virtual machine.
NOTE: Not all motherboards and CPUs can support VT-d/AMD-d virtualization.
- Intel EMT64 or AMD64 with Intel VT/AMD-V CPU flag.- Memory, minimum 2 GB for OS and Proxmox VE services. Plus designated memory for guests. For Ceph or ZFS additional memory is required, approximately 1 GB memory for every TB used storage.- Fast and redundant storage, best results with SSD disks.- OS storage: Hardware RAID with batteries protected write cache (“BBU”) or non-RAID with ZFS and SSD cache.- VM storage: For local storage use a hardware RAID with battery backed write cache (BBU) or non-RAID for ZFS. Neither ZFS nor Ceph are compatible with a hardware RAID controller. Shared and distributed storage is also possible.- Redundant Gbit NICs, additional NICs depending on the preferred storage technology and cluster setup – 10 Gbit and higher is also supported.- For PCI(e) passthrough a CPU with VT-d/AMD-d CPU flag is needed
1.2 Installation Files
Download the latest Proxmox ISO from the official repository.
1.3 USB Boot Loader
There are several options available for making USB boot loaders.
- Balena Etcher (easiest to use)
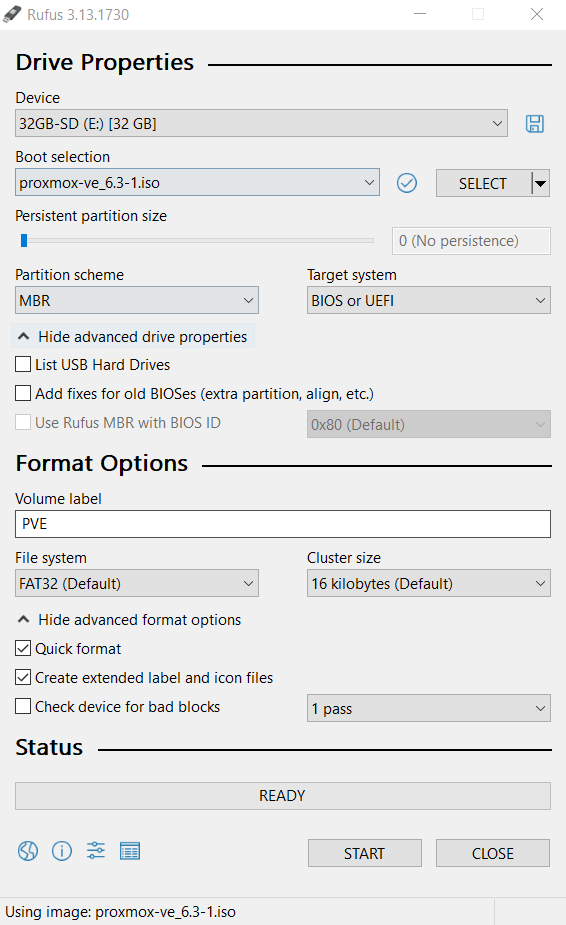
- Rufus (more complex)
For this guide, we’ll use Rufus.
After running Rufus, choose your USB drive from the Device list at the top, then click ‘Select’ and choose the Proxmox ISO you downloaded. Ensure the Target System is set to ‘BIOS or UEFI’, leave the default settings and click ‘Start’ to begin creating the USB Boot Drive.
2.0 Installation
2.1 Pre-Install
2.1.1 Host BIOS Prep
- Insert the USB Boot Drive into the host
- Power up the host
- Press delete or F2 to enter the UEFI boot menu (may be a different key for your system so consult your manual if necessary)
2.1.2 Enable VT-d/AMD-d CPU flags
This part is optional and only necessary if you intend to allow virtual machines to use physical hardware like graphics cards.
The UEFI menus can be different, so, to enable the VT-d/AMD-d CPU flags, look for Enable Virtualization Technology and set to Enabled.
It’s possible that the motherboard manufacturer has it listed under a different name, so be sure to consult the manufacturer’s manual as well as ensure that both the motherboard and CPU can handle virtualization if you can’t find it.
2.1.3 Set boot drive
- Press F7 to enter advanced mode
- Find the boot options/priority
- Choose the UEFI version of your USB Boot Drive (may be just the name of your USB Boot Drive)
- Press F10 to save and restart
2.2 Install
The installation process is fairly simple and you can leave any defaults you find. I suggest setting a static IP to make accessing the WebUI much easier.
The default user account for local login, SSH and WebUI is root and the password will be what you set during the installation so don’t forget it!
The official installation guide can be found on the Proxmox website.
2.3 Post-Install
Boot into the UEFI menu then navigate to the boot options/priority list and set your UEFI Proxmox drive as #1 to ensure the system boots properly every time.
3.0 Setup
When you finish the installation and boot for the first time, you’ll be presented with a login screen and a banner showing the IP address to connect to the WebUI. If you want to continue locally, login in with the user root and password you set in the installation and skip to 3.2 Update, but take note of the WebUI URL for later on.
3.1 Remote access
There are several ways you can access the Proxmox environment and virtual machines. The preferred ways are SSH and Remote Desktop (for Windows VMs).
3.1.1 WebUI
- From a different device, browse to
https://your-pve-ip:8086/. - Click ‘Advanced’ and allow the connection.
- Sign in using the username root and the password you chose during the installation.
- In the left column, expand Datacenter and select PVE (or whatever you named the node in the installation).
- In the top right, click Shell to open a console window.
3.1.2 SSH
There are several ways you can SSH into your Proxmox environment.
NOTE: By copying the SSL certificate from your device to the authorized list on the server, you can log in without having to enter a password.
3.1.2a PuTTY
For Windows, my preferred way is to download PuTTY, so I can keep a collection of saved connections with non-default ports for SSH, baud rates for Serial connections, etc.
- Select SSH.
- Enter your PVE IP.
- Click Connect.
- Enter your password.
3.1.2b Terminal Prompt
You can run this in either Windows or Linux.
- From command/terminal prompt, run:
ssh -l root your-pve-ip. - Enter your password.
3.2 Update
Run the following commands to update the system:
apt-get update
apt-get upgrade
apt-get dist-upgrade
4.0 Virtual Machines
Log in to the WebUI to start making virtual machines (VMs).
4.1 Uploading ISOs
Note: You can’t upload ISOs to storage devices that don’t have the ISO images set in Datacenter > Storage
- Expand Datacenter > pve in the left column.
- Select the ISO storage you setup earlier.
- Click Upload then Select File… and chose the ISO you want to upload.
- Click Upload to start uploading the ISO.
4.2 Create a Virtual Machine
- Expand Datacenter > pve in the left column
- Right-click on pve and choose Create VM
- General — Enter a name and click Next
- OS — Select your ISO Storage and your ISO then click Next (Guest OS should be defaulted to Linux 5.x — 2.6 Kernel — Set type to Microsoft Windows if necessary)
- System — Leave System defaults and click Next
- Hard Disk — Select local-lvm for Storage then click Next
- CPU — Leave CPU defaults and click Next
- Memory — Leave Memory defaults and click Next
- Network — Leave Network defaults and click Next (Some windows machines won’t recognize the VirtIO model so you might have to try the physical NIC option)
- Click Finish
4.2.1 Ubuntu Live Server 20.04
- Download the ISO from https://releases.ubuntu.com/20.04/
- Upload to your ISO storage
- Create a VM
- Expand Datacenter > pve and right-click the newly created VM
- Select Start
- Right-click the VM again and select Console to open up a new window
- Follow the installation process and make sure you allow OpenSSH to install for remote administration
You should now have a working basic Proxmox environment with a running VM you can SSH into. Congratulations!
5.0 References
Proxmox Logo; 01–07–2021; https://forum.proxmox.com/styles/uix/images/Proxmox-logo-stacked-white-background-1200.png
Proxmox Requirements; 01–07–2021; https://www.proxmox.com/en/proxmox-ve/requirements
Proxmox ISOs; 01–07–2021; https://www.proxmox.com/en/downloads/category/iso-images-pve
Balena Etcher; 01–07–2021; https://www.balena.io/etcher/
Rufus; 01–07–2021; https://rufus.ie/
Proxmox Installation; 01–07–2021; https://pve.proxmox.com/wiki/Installation
Ubuntu Server 20.04; 01–07–2021; https://releases.ubuntu.com/20.04/
6.0 Author’s Notes
- Thanks for reading this guide. If you have any problems, questions or suggestions, feel free to let me know. I’ll try to help as best I can.
- Having a CPU with VT-d/AMD-d enabled is optional as I’ve had this running on systems without it.